One Science Place and Handle Server Deployment Guidelines
- Details
- Published on Tuesday, 14 February 2023 01:20
By: Dinuka De Silva and Marlon Pierce
Overview
The Handle.Net system, developed by the Corporation for National Research Initiatives (CNRI), provides services for creating, managing, and resolving global persistent identifiers for digital objects. A common use case is for a persistent identifier to act as a permanent URL for a digital object that redirects to the current object’s current URL. Handle.Net deployments can store potentially any digital objects. Built-in types (in addition to URLs) include public keys and email addresses.
The Handle.Net system consists of three parts:
- The Global Handle Registry
- A local Handle Server deployment
- Clients
Figure 1 provides a summary illustration of the relationships between the three parts of the system.
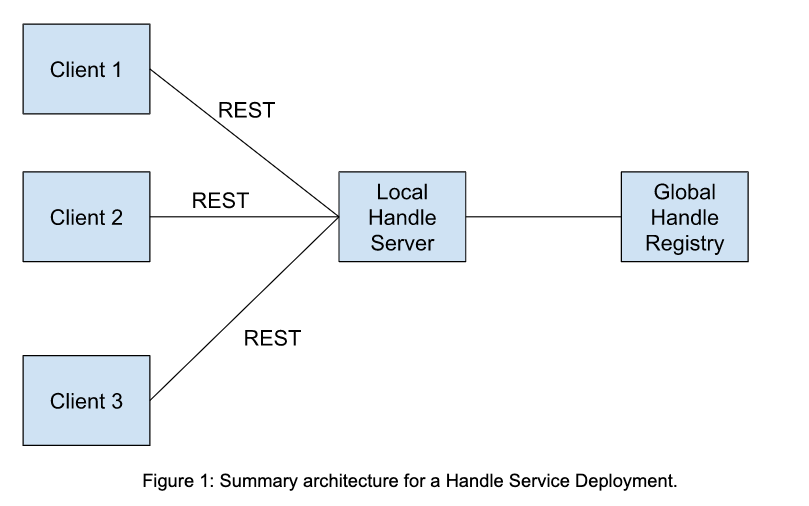
To use Handle.Net, you must first deploy a local Handle Server, which in turn acts as a client to the Global Handle Registry system operated by the DONA Foundation. Each local Handle Server has a unique prefix, purchased from CNRI, that provides a base namespace. Specific handle identifiers (which are unique) begin with this prefix. The local Handle Server serves a particular community through one or more client applications.
The Global Handle Registry provides resolvable URLs for handle identifiers of the form
https://hdl.handle.net/<localhandleserver_prefix handle_identifer="">
and ensures handles created by a local server are globally unique. Handle data for a particular prefix are stored on the associated local Handle Server, so HTTP requests directed for a particular handle are proxied from the Global Handle Registery to the appropriate local Handle Server. If the local Handle Server is down, then the URLs associated with this prefix will not be available.
Clients interact with local deployments through API calls, which may use either Java or C SDKs or the REST API. Here we assume that multiple client applications (like science gateways) use the same local Handle Server.
For more information on the Handle.Net system, see http://www.handle.net/index.html and the technical manual, http://www.handle.net/tech_manual/HN_Tech_Manual_9.pdf.
This document provides supplemental information to the technical manual.
Deploying and Administering a Local Handle Server
The key steps in this example are creating and installing valid SSL certificates. These will be needed for clients to connect to the HTTPS server.
- Identify a host computer to run your Handle Server (typically, a VM). You’ll need to have root access to perform the installation.
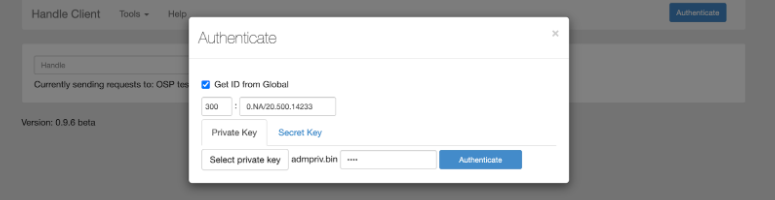
- Purchase a prefix from https://www.handle.net/prefix.html. In the examples below, the prefix for our local Handle Server is “20.500.14233”. The full name is 0.NA/20.500.14233, and 300 is the index of the public key index.
- Download handle software and extract to /hs/handle-9.3.0. https://www.handle.net/download_hnr.html
- Configure the server
sudo /hs/handle-9.3.0/bin/hdl-setup-server /hs/svr_1
- Upload the generated sitebndl.zip to handle.net http://www.handle.net/prefix_request.html
- Update the prefix in the server configuration file “/hs/svr_1/config.dct”. Note “300” is the default index for the server admin’s public key associated with the handle 20.500.14233. See for example https://hdl.handle.net/20.500.14233/HANDLE_ADMIN.
… "server_config" = { "server_admins" = ( "300:0.NA/20.500.14233", ) … "replication_admins" = ( "300:0.NA/20.500.14233" ) … "auto_homed_prefixes" = ( "0.NA/20.500.14233" ) } … - Open required ports
sudo ufw allow 8000/tcp
sudo ufw allow 2641/tcp
sudo ufw allow 2641/udp
- Run the Handle Server
sudo /hs/handle-9.3.0/bin/hdl-server /hs/svr_1
- Now, the Handle Server’s admin dashboard is accessible via
 https://<host or IP>:8000/admin/
Eg: https://149.165.173.12:8000/admin/ or https://js-173-12.jetstream-cloud.org:8000/admin/
- Install certificates
sudo apt-get install certbot
sudo certbot certonly
- And then you would have the pair of certificates as follows. The host server in this example is js-173-12.jetstream-cloud.org, so replace this with your server name.
Certificate Path: /etc/letsencrypt/live/js-173-12.jetstream-cloud.org/fullchain.pem
Private Key Path: /etc/letsencrypt/live/js-173-12.jetstream-cloud.org/privkey.pem
- Copy the pair of certificates to the /hs/svr_1 folder using following commands (again, replacing js-173-12.jetstream-cloud.org with your server’s name).
 sudo cp /etc/letsencrypt/live/js-173-12.jetstream-cloud.org/fullchain.pem /hs/svr_1/serverCertificate.pem
sudo /hs/handle-9.3.0/bin/hdl-convert-key -f handle /etc/letsencrypt/live/js-173-12.jetstream-cloud.org/privkey.pem /hs/svr_1/serverCertificatePrivateKey.bin
- Restart the server and access the handle dashboard through a cache cleaned browser. The chances are ssl changes may not have reflected instantaneously.
Using REST Clients with Public/Private Key-Based Authentication
Client applications connect to local Handle Servers to create new handles, modify the content of handles, or delete them. Client applications can run anywhere and connect remotely to the local Handle Server.
We limit our discussion to REST clients, since these can be in any programming language. Java and C client libraries are available from http://www.handle.net/client_download.html.
This section illustrates how clients authenticate to the local Handle Server using the client’s public-private key pair. These keys should be created using command line tools included in the Handle Server distribution.
It is also possible to use password-based authentication, but this is not recommended by CNRI.
Registering a Client Application
- Get a pair of RSA keys for the client. We recommend using the tools that come in the Handle Server distribution.
sudo /hs/handle-9.3.0/bin/hdl-keygen -alg RSA client-privkey.bin client-pubkey.bin
- Convert the keys to PEM format
sudo /hs/handle-9.3.0/bin/hdl-convert-key -f PEM client-privkey.bin client-privkey.pem
sudo /hs/handle-9.3.0/bin/hdl-convert-key -f PEM client-pubkey.bin client-pubkey.pem
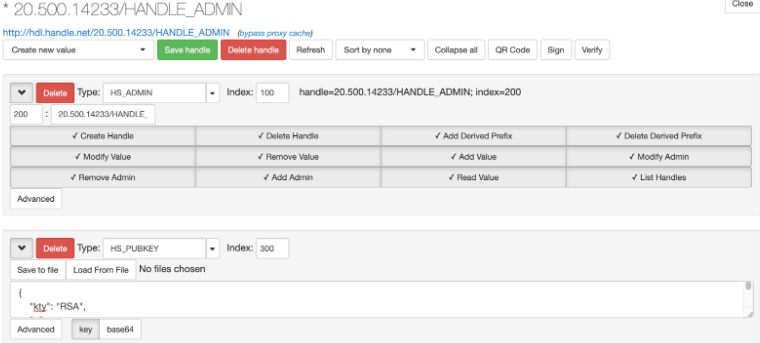
- Create an admin handle for the client (eg: “20.500.14233/HANDLE_ADMIN”) using the admin dashboard (https://your.handle.server:8000/admin/). Note here that 20.500.14233 is our server’s specific prefix. “HANDLE_ADMIN” can be replaced by anything else you’d like (“TEST”, “GATEWAY1”, etc).
- Upload (“Load FromFile” button) the public key (client-pubkey.bin) to the created admin handle using the Handle Server’s Admin interface. And move the private key to where the client is. Client needs the private key to sign the signature (14.6.6)
- Configure the prefix as a “server_admins” in “/hs/svr_1/config.dct”. (NB: “0.NA” applies only the prefix handle) Any admin prefix added again is going to be appended to the list.
… "server_admins" = ( "300:0.NA/20.500.14233", "300:20.500.14233/HANDLE_ADMIN" ) … - Make sure to restart the server after changing “/hs/svr_1/config.dct"
Testing the Deployment with cURL Commands
The following are UNIX command-line operations for the client. The client can be any machine that can connect to the Handle Server; the client needs the private key corresponding to the public key deployed in the “Registering a Client Application” step.
This session provides worked examples for sections 14.6 and 14.7 of the Technical Manual.
The local Handle Server in these examples is deployed on js-173-12.jetstream-cloud.org. Change this to your server. Be sure to provide the correct path to the private key.
handleApiBaseUrl="https://js-173-12.jetstream-cloud.org:8000"
clientPrivateKey="client-privkey.pem"
cnonce=$(head -c 16 < /dev/urandom  | base64)
- Initialize a sessions
response1=$(curl --location --request \
  POST $handleApiBaseUrl'/api/sessions' \
     --header 'Authorization:  Handle cnonce="'$cnonce'"')

echo $response1
{"sessionId":"node0ualzfr6i6pwq12exbgfkapjw14","nonce":"2qUGtxuDvzaxy6qhOid8Sw==","serverAlg":"SHA-256","serverSignature":"Gj0QqGZ9XloThob2YY0swhmepv5Ncvylc3yI8EMxA3QoTFqLdY8UfhB8TVMoRQRf/BqWh/5Xdm5ThGE8jbh2TvmMaenNWptSiS5lM9Pi1i93iVW+nXk4Bk8ufQIVQnSCLcpUKJlwcwZTcRdn/wSfzjenM0j1GPGqAQebW9H/C2TQhxJXvLRhhGHdIqkqiIsGV180R+pGCMkO73l5//fOF4iUci8s1XGsDY9w0SAtrOoCq5T4mr2qTN2KUwbxGRID0On+e0pkTCVttccImhAtdaJkKubeGlGq4dOj212TVtzLl7UtS457DK+2Cq+5gkueg2+qmZQDpHzcSP/+fQcf3Q=="}
The server returns a sessionID and a nonce in its response, which you should use in subsequent calls.sessionId=$(echo $response1 | jq -r ".sessionId") nonce=$(echo $response1 | jq -r ".nonce")
- Get serverAlg and serverSignature: the GET operation below returns the server’s hashing algorithm and signature, which the client can use to authenticate the server (this step isn’t shown here but can be done with openssl tools, for example).
response2=$(curl --location --request \ GET $handleApiBaseUrl'/api/sessions/this' \ --header 'Authorization: Handle sessionId="'$sessionId'", cnonce="'$cnonce'", nonce="'$nonce'" ' \ --header 'Content-Type: application/json') echo $response2 {"sessionId":"node0ualzfr6i6pwq12exbgfkapjw14","nonce":"2qUGtxuDvzaxy6qhOid8Sw==","serverAlg":"SHA-256","serverSignature":"Gj0QqGZ9XloThob2YY0swhmepv5Ncvylc3yI8EMxA3QoTFqLdY8UfhB8TVMoRQRf/BqWh/5Xdm5ThGE8jbh2TvmMaenNWptSiS5lM9Pi1i93iVW+nXk4Bk8ufQIVQnSCLcpUKJlwcwZTcRdn/wSfzjenM0j1GPGqAQebW9H/C2TQhxJXvLRhhGHdIqkqiIsGV180R+pGCMkO73l5//fOF4iUci8s1XGsDY9w0SAtrOoCq5T4mr2qTN2KUwbxGRID0On+e0pkTCVttccImhAtdaJkKubeGlGq4dOj212TVtzLl7UtS457DK+2Cq+5gkueg2+qmZQDpHzcSP/+fQcf3Q=="} serverAlg=$(echo $response2 | jq -r ".serverAlg") serverSignature=$(echo $response2 | jq -r ".serverSignature") - Create the signature for “HS_PUBKEY”: following the instructions in Section 14.6.6, the client creates and signs its signature file.
signature=$((echo $nonce | base64 -D;echo $cnonce | base64 -D) | openssl sha256 -sign $clientPrivateKey | base64)
- Authenticate session: send the signature that you created in the previous step back to the server, along with the algorithm you used (sha256 in this example).
response3=$(curl --location --request \ PUT $handleApiBaseUrl'/api/sessions/this' \ --header 'Authorization: Handle sessionId="'$sessionId'",id="300:20.500.14233/HANDLE_ADMIN",type="HS_PUBKEY",cnonce="'$cnonce'",alg="SHA256",signature="'$signature'"' \ --header 'Content-Type: application/json') echo $response3 {"sessionId":"node0ualzfr6i6pwq12exbgfkapjw14","nonce":"2qUGtxuDvzaxy6qhOid8Sw==","authenticated":true,"id":"300:20.500.14233/HANDLE_ADMIN2"} - Mint a handle: the session is now authenticated, so the client can now create handles. The example below shows how to create an HS_ADMIN entry.
response4=$(curl --location --request \
  PUT $handleApiBaseUrl'/api/handles/20.500.14233/HANDLE_ADMIN/?overwrite=false&mintNewSuffix=true' \
    --header 'Authorization:  Handle sessionId="'$sessionId'"' \
    --header 'Content-Type:  application/json' \
    --data-raw '{"handle":"20.500.14233/HANDLE_ADMIN/","values":[{"index":100,"type":"HS_ADMIN","data":{"format":"admin","value":{"handle":"0.NA/20.500.14233","index":200,"permissions":"111111111111"}}}]}'
)

echo $response4
{"responseCode":1,"handle":"20.500.14233/HANDLE_ADMIN/77790e96-19cb-4e35-ac2b-55e62f72f41f"}
You can verify the operation using the local Handle Server’s admin client or go directly to the handle URL, http://hdl.handle.net/20.500.14233/HANDLE_ADMIN/77790e96-19cb-4e35-ac2b-55e62f72f41f.
Using Clients to Create and Modify URL Handles
This example shows how to associate URLs with persistent handles.
- Create a handle with URL
response4=$(curl --location --request \ PUT $handleApiBaseUrl'/api/handles/20.500.14233/HANDLE_ADMIN/?overwrite=false&mintNewSuffix=true' \ --header 'Authorization: Handle sessionId="'$sessionId'"' \ --header 'Content-Type: application/json' \ --data-raw '{ "handle":"20.500.14233/HANDLE_ADMIN/", "values":[ { "index":100, "type":"URL", "data":{ "format":"string", "value": "https://www.handle.net/faq.html" } } ] }' ) echo $response4 {"responseCode":1,"handle":"20.500.14233/HANDLE_ADMIN/bbdd6925-a9b3-4be5-8cb4-92eeb4d13f62"} handle=$(echo $response4 | jq -r ".handle") - Adding or Modifying URL of an existing handle: this example will modify the URL value associated with the handle created in the previous step.
response5=$(curl --location --request \
  PUT $handleApiBaseUrl'/api/handles/'$handle \
    --header 'Authorization:  Handle sessionId="'$sessionId'"' \
    --header 'Content-Type:  application/json' \
    --data-raw '{
      "handle":"'$handle'",
      "values":[
        {
          "index":100,
          "type":"URL",
          "data":{
            "format":"string",
            "value": "https://www.handle.net"
          }
        }
      ]
   }'
)
echo $response5
{"responseCode":1,"handle":"20.500.14233/HANDLE_ADMIN/bbdd6925-a9b3-4be5-8cb4-92eeb4d13f62"}
Adding Additional Clients
You can use a local Handle Server deployment with multiple clients; for example, each gateway tenant of a science gateway hosting platform like One Science Place needs a separate client.
Additional clients are added following the steps of Registering a Client Application, We repeat the steps here again specific example values for the second client for clarity. Each client will have its own public-private keypair. Note the clients don’t need to be called “HANDLE_ADMIN” and “HANDLE_ADMIN2”.
- Get a pair of RSA keys for the client
sudo /hs/handle-9.3.0/bin/hdl-keygen -alg RSA client2-privkey.bin client2-pubkey.bin
- Convert the keys to PEM format
sudo /hs/handle-9.3.0/bin/hdl-convert-key -f PEM client2-privkey.bin client2-privkey.pem
sudo /hs/handle-9.3.0/bin/hdl-convert-key -f PEM client2-pubkey.bin client2-pubkey.pem
- Create an admin handle for the client (eg: “20.500.14233/HANDLE_ADMIN2”) using the admin dashboard (https://your.handle.server:8000/admin/)
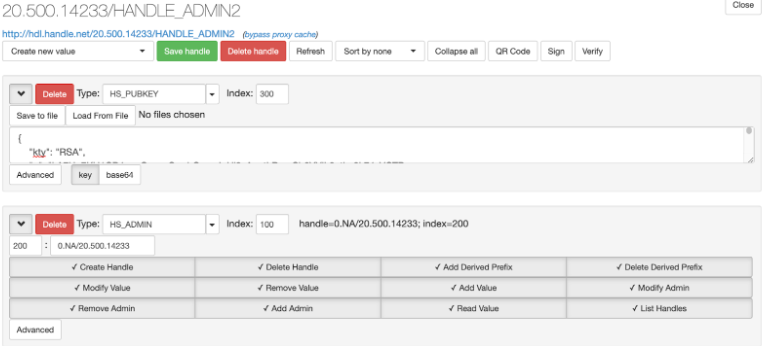
- Upload (“Load FromFile” button) the public key (client2-pubkey.bin) to the created admin handle using the Handle Server’s Admin interface. And move the private key to where the client is. Client needs the private key to sign the signature (14.6.6)
- Configure the prefix as a “server_admins” in “/hs/svr_1/config.dct”. (NB: “0.NA” applies only to the prefix handle). Append additional clients to the list.
… "server_admins" = ( "300:0.NA/20.500.14233", "300:20.500.14233/HANDLE_ADMIN", "300:20.500.14233/HANDLE_ADMIN2" ) … - Make sure to restart the server after changing “/hs/svr_1/config.dct”
See Section 1.4 of the Technical Manual for additional information. There are potentially other approaches for having multiple clients. For example, the handle 20.500.14233/HANDLE_ADMIN can store multiple public keys with different indexes. The default is 300, but one could also store a second key with the index 301 on the same handle. This would be resolved as 301:20.500.14233/HANDLE_ADMIN.
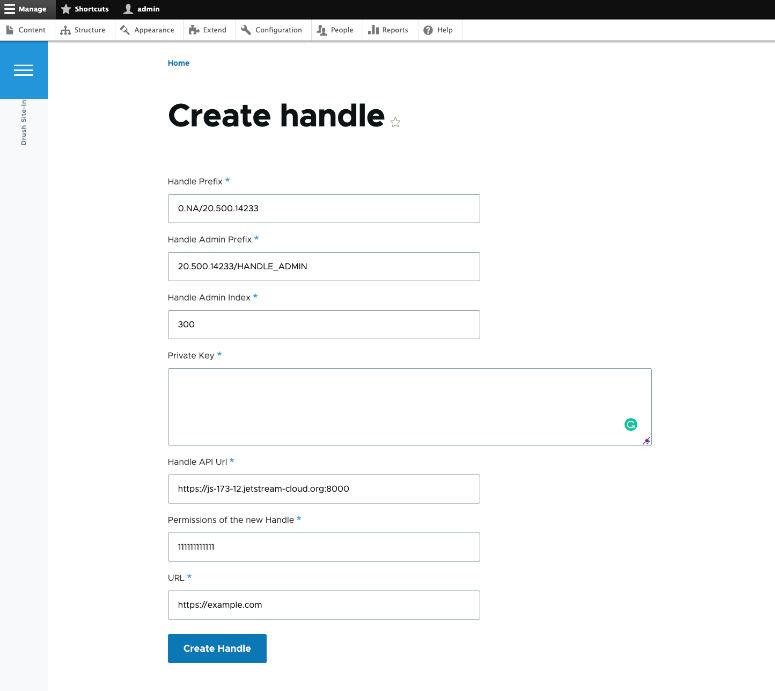
Example Drupal Clients
The following Drupal module has a form that uses the HandleServer REST API to create a session and a handle through the “HS_PUBKEY” authentication. The public key associated with the private key that’s pasted into the form should have been uploaded to the admin prefix specified in the form. The “submitForm” method in “CreateHandle.php” class illustrates how the requests go through etc.
https://github.com/dinukadesilva/drupal_example_using_handle_api
Further Reading
- https://en.wikipedia.org/wiki/Handle_System
- https://www.rfc-editor.org/rfc/rfc3650.txt
- https://www.rfc-editor.org/rfc/rfc3651.txt
- https://www.rfc-editor.org/rfc/rfc3652.txt